No-Bake Yuzu Cheesecake with vibrant citrus flavor and silky creaminess—an elegant, oven-free dessert!

No-Bake Yuzu Cheesecake is the dessert you bring out when you want jaws to drop without ever turning on the oven!
Ingredients For No-Bake Yuzu Cheesecake

For The Biscuit Crust
- Digestive biscuits or graham crackers – 2 cups (about 200 g), finely crushed
- Unsalted butter – 7 tablespoons (100 g), melted and slightly cooled
- Granulated sugar – 2 tablespoons
- Fine sea salt – ¼ teaspoon
For The Yuzu Cheesecake Filling
- Cream cheese – 16 oz (450 g), full-fat, room temperature
- Greek yogurt or sour cream – ½ cup (120 g), full-fat
- Powdered sugar – 1 cup (120 g), sifted
- Yuzu juice – ⅓ cup (80 ml)
- Fresh, bottled, or a yuzu concentrate diluted according to label
- Yuzu zest – 1–2 teaspoons (or lemon zest if yuzu zest isn’t available)
- Heavy whipping cream – 1 cup (240 ml), very cold
- Vanilla extract – 1 teaspoon
- Powdered gelatin – 2½ teaspoons (about 7–8 g)
- Cold water – 3 tablespoons (for blooming gelatin)
For The Yuzu Jelly Topping
- Yuzu juice – ¼ cup (60 ml)
- Water – ½ cup (120 ml)
- Granulated sugar – 3 tablespoons
- Powdered gelatin – 1 teaspoon (about 3 g)
- Cold water – 2 tablespoons (for blooming gelatin)
For Garnish (Optional But Gorgeous)
- Thin slices of fresh yuzu, lemon, or lime
- White chocolate shavings
- A few edible flowers or mint leaves
How To Build Your No-Bake Yuzu Cheesecake, Layer By Layer
1. Prepare The Pan And Set Yourself Up
- First, give your future self an easy life.
- Take your springform pan and lightly grease the base and sides with a tiny amount of melted butter or neutral oil.
- Cut a circle of parchment to fit the base and press it down. This gives you a smooth bottom that lets the cheesecake slide off cleanly later.
- Place the pan on a flat tray or baking sheet so you can move it in and out of the fridge without wobbling the layers.
2. Make The Biscuit Crust So It Actually Holds Together
You want a crust that slices cleanly, not a sand avalanche.
Crush The Biscuits
- Add biscuits or graham crackers to a food processor. Blitz until they look like fine, even crumbs—no big chunks hiding in there.
- If you’re using a rolling pin, seal the biscuits in a zip-top bag, squeeze out extra air, and roll until the crumbs look uniform.
Add Butter, Sugar, And Salt
- Pour the crumbs into a bowl.
- Add the melted butter, sugar, and salt.
- Mix with a fork or spatula until every crumb looks damp and the mixture clumps when you squeeze it in your hand. If you tilt the bowl, you shouldn’t see dry dust sliding around.
Press Into The Pan
- Tip the mixture into your prepared springform pan.
- Use your hands to spread the crumbs evenly, then use the bottom of a measuring cup or a glass to press them down firmly.
- Push some crumbs slightly up the sides, about ½–1 inch, to give a shallow “wall” that hugs the filling.
Chill The Crust
- Slide the pan into the fridge for at least 20–30 minutes while you work on the filling.
- A cold, firm crust gives the filling something solid to sit on and prevents crumbling when you slice.
3. Bloom The Gelatin For The Filling
- Gelatin likes to be treated gently. You’re giving it a little spa moment before it meets the rest of the mixture.
- Add 2½ teaspoons powdered gelatin to a small bowl.
- Pour 3 tablespoons cold water over it evenly.
- Let it sit on the counter for 5–10 minutes. The granules absorb the water and swell into a soft, almost rubbery mass—that’s called blooming.
- Keep it nearby. You’ll melt it in a moment.
4. Mix The Yuzu Cheesecake Filling Until Silky
Now the fun part: building the creamy citrus center.
Beat The Cream Cheese
- Add the room-temperature cream cheese to a large mixing bowl.
- Beat with an electric mixer on medium speed for 2–3 minutes, until it looks smooth and fluffy.
- Scrape down the sides and bottom of the bowl so no lumps hide.
Add Powdered Sugar And Yogurt
- Add the sifted powdered sugar and Greek yogurt (or sour cream).
- Beat again for 2–3 minutes, starting on low and working up to medium, until the mixture looks glossy and completely smooth.
- If you see tiny lumps, keep going. This is your chance to get the texture perfect.
Add Yuzu Juice, Zest, And Vanilla
- Pour in the yuzu juice, add the yuzu zest, and the vanilla extract.
- Beat on low speed just until everything is fully combined.
- Taste a little on a spoon. The flavor should be bright, tangy, and slightly sweet. Remember, whipped cream will later soften the perception of sourness, so a bold flavor now translates to perfectly balanced later.
Whip The Cream Separately
- In a second bowl, pour in the cold heavy cream.
- Using clean beaters, whip on medium-high speed until you reach medium peaks—when you lift the beaters, the peaks stand up but curl slightly at the tip.
- You don’t want stiff, grainy cream here; that turns the texture heavy instead of airy.
5. Melt The Gelatin And Add It Without Clumps
Now you bring the structure into the party.
Melt The Bloomed Gelatin
- Place the bowl of bloomed gelatin over a small saucepan of barely simmering water, or microwave it in 5–10 second bursts, stirring in between, until it turns into a clear liquid.
- It should look fully melted with no grains left.
Temper The Gelatin
- Scoop a few spoonfuls of the cream cheese mixture into the liquid gelatin and whisk quickly.
- This warms the gelatin gently and makes it easier to blend into the full bowl without forming stringy bits.
Add To The Main Bowl
- Pour the gelatin mixture into the main bowl of yuzu filling while the mixer runs on low speed.
- Mix just until it disappears into the filling. Scrape the bottom and sides once more to catch any streaks.
Fold In The Whipped Cream
- Add one-third of the whipped cream and fold it in with a spatula to lighten the mixture.
- Gently fold in the remaining whipped cream in two more additions, scooping from the bottom and turning over the top.
The goal is a smooth, thick, cloud-like filling with no visible streaks of cream.
6. Fill The Pan And Chill The Cheesecake
Now that everything is beautifully combined, you assemble the main layer.
Add The Filling To The Crust
- Take the chilled crust out of the fridge.
- Pour the yuzu filling over the crust, letting it spread to the edges.
- Use an offset spatula or the back of a spoon to smooth the top into an even layer.
Release Air Bubbles
- Gently tap the pan on the counter a few times to knock out any large air bubbles.
- If you see a big bubble pop up, poke it with a toothpick and smooth over the surface.
Chill Until Firm
- Place the pan back on its tray and slide it into the fridge.
- Chill for at least 4 hours, preferably overnight. The filling needs this time to set fully before you add the jelly layer.
If you touch the surface lightly, it should feel set and not wobble like a liquid. A very subtle jiggle in the center is fine; it tightens further with the topping and extra chill time.
7. Make The Glossy Yuzu Jelly Topping
Once the cheesecake layer feels firm, you dress it in a bright, citrusy coat.
Bloom The Gelatin
- Add 1 teaspoon powdered gelatin to a small bowl.
- Pour 2 tablespoons cold water over it and let it sit for 5–10 minutes until thick and spongy.
Heat The Liquid
- In a small saucepan, combine the yuzu juice, ½ cup water, and granulated sugar.
- Warm over medium heat, whisking until the sugar dissolves completely and the mixture steams slightly.
- Do not let it boil furiously; a gentle steam is enough.
Melt The Gelatin Into The Yuzu Mixture
- Remove the pan from the heat.
- Add the bloomed gelatin and whisk until it dissolves fully into the hot liquid. The mixture should look clear, not cloudy.
Cool Before Pouring
- Pour the yuzu mixture into a heatproof jug or bowl.
- Let it stand at room temperature for 15–20 minutes, stirring once or twice.
- It should feel just slightly warm—not hot—before you pour it onto the cheesecake. Warm liquid keeps the top smooth without melting the filling.
Add The Jelly Layer
- Take the cheesecake from the fridge.
- Slowly pour the yuzu jelly mixture over the center of the cheesecake, letting it spread out to the edges.
- If you pour too fast, it might dig into the filling, so keep the stream gentle and steady.
Chill Again To Set The Jelly
- Return the cheesecake to the fridge and chill for at least 2 more hours, until the jelly layer feels firm and delicate to the touch.
8. Unmold, Garnish, And Slice Like A Pro

The moment of truth: getting clean edges and pretty slices.
Loosen The Sides
- Run a thin knife or offset spatula around the inside of the pan, pressing the blade gently against the metal to avoid cutting into the cheesecake.
- Release the springform latch slowly and lift the ring straight up.
Garnish The Top
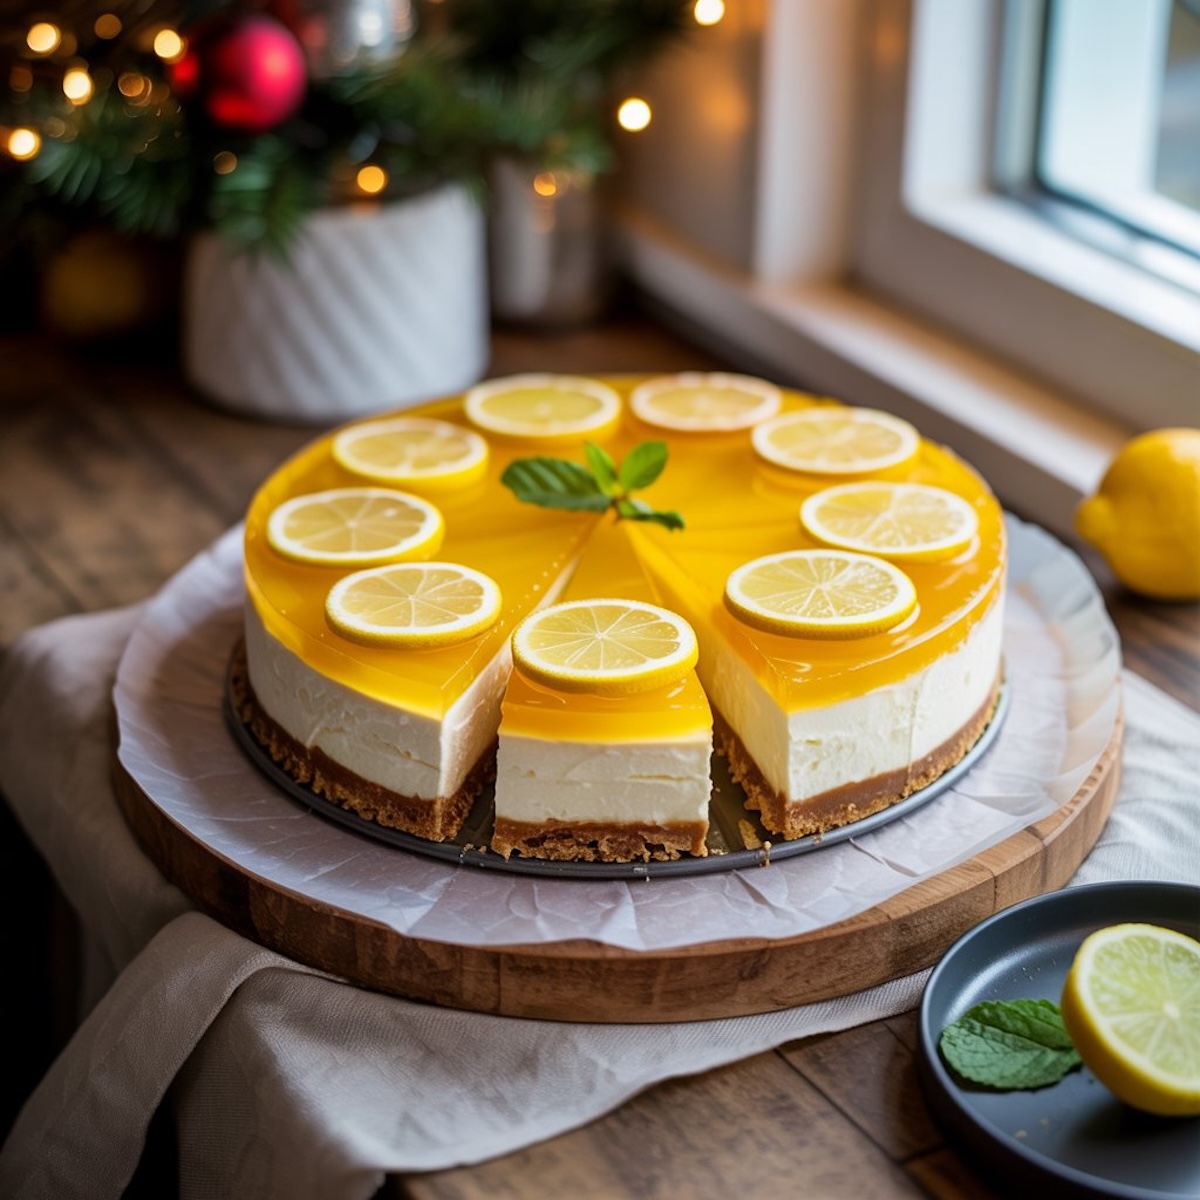
- Arrange thin slices of yuzu, lemon, or lime on the jelly surface.
- Add a few sprinkles of white chocolate shavings or a couple of mint leaves if you want that “restaurant dessert” vibe.
Slice Cleanly
- Use a long, sharp knife.
- Dip the blade in hot water, wipe it dry, make one clean cut, then wipe and rewarm the knife before each new slice.
- This little ritual gives you those perfect cross-sections with visible layers: biscuit, cream, jelly.
You’ve just built a dessert that tastes like a Japanese citrus grove dressed in French patisserie clothing, without once reaching for the oven controls. Every slice delivers a cool, bright, creamy moment that wakes up everyone at the table.
When you want a dessert that feels elegant, playful, and effortless all at once, this no-bake yuzu cheesecake quietly steals the entire show.
Do not miss this 4-Ingredient Crock-Pot Holiday Candy!