Homemade English Muffins with chewy centers, crisp edges, and classic nooks and crannies!

Homemade English Muffins are the kind of kitchen magic that make you feel like you’ve unlocked a secret bakery door right at home!
What Makes These Homemade English Muffins So Good?
Let’s set the bar high right away. These muffins:
- Rise overnight in the fridge for real, developed flavor.
- Use a simple dough that feels soft, elastic, and forgiving.
- Cook on the stovetop first for that iconic golden crust.
- Finish in the oven so the centers cook through without burning the bottoms.
- You mix one dough, wait, shape, griddle, bake, and suddenly your kitchen smells like an old-school bakery. Very dangerous if people in your home follow their nose.
Ingredients For The Best Homemade English Muffins

This recipe makes 10–12 English muffins, depending on how big you cut them.
For The Dough
- Warm whole milk – 1¼ cups (around 105–110°F / 40–43°C)
- Warm water – ¼ cup (same temperature as the milk)
- Instant yeast – 2¼ teaspoons (one standard packet)
- Honey – 1 tablespoon (or sugar, if you prefer)
- Unsalted butter – 3 tablespoons, melted and cooled slightly
- All-purpose flour – 3½ cups, spooned and leveled
- Fine sea salt – 1½ teaspoons
For Dusting And Cooking
- Fine cornmeal or semolina – ½ cup, for dusting
- Neutral oil or a little extra butter – for greasing the skillet
Mixing The Dough: Where Breakfast Actually Starts!!
You don’t wake up and just “have” homemade English muffins. You start the night before like the organized breakfast genius you secretly are.
1. Wake Up The Yeast
- In a large mixing bowl (or the bowl of your stand mixer), pour in the warm milk and warm water.
- Add the honey and stir until it dissolves into the liquid.
- Sprinkle the instant yeast over the top.
- Let the mixture rest for 5–7 minutes until the surface looks slightly foamy and creamy. That foam tells you the yeast is alive and ready to work for you.
2. Add The Flour And Butter
- Add the melted, slightly cooled butter to the yeast mixture and stir briefly.
- Add about 3 cups of the flour and all of the salt.
- Stir with a sturdy wooden spoon until a shaggy, sticky dough forms. At this stage it looks rough, and that’s perfect.
- Now you decide how to knead: by hand or with a stand mixer. Both work beautifully.
Kneading The Dough Until Soft And Elastic
3. Knead By Hand
- Dust a clean work surface with a light layer of flour.
- Scrape the shaggy dough out of the bowl onto the surface.
- Sprinkle a little more flour over the top of the dough.
- Start kneading: push the dough away with the heel of your hand, fold it back toward you, turn it a quarter turn, and repeat.
- Keep going for 8–10 minutes, adding small dustings of the remaining flour only when the dough sticks aggressively to the counter.
You are looking for:
- A smooth surface
- A dough that feels soft and slightly tacky, not dry
- A stretchable texture that lets you pull on a piece without it tearing instantly
4. Knead With A Stand Mixer (If You Love Convenience)
- Fit your mixer with a dough hook.
- Mix on low speed for 6–8 minutes, adding the remaining flour a tablespoon at a time only if the dough clings hard to the bottom.
- Stop once the dough gathers around the hook, looks smooth, and feels soft when you press it with a finger.
- Either way, once you reach that smooth, springy dough stage, you’re ready to rest it.
First Rise: Let The Dough Take A Nap
5. First Rise At Room Temperature
- Lightly oil a clean bowl. Place the dough inside and turn it once so a thin layer of oil coats the surface.
- Cover the bowl with a lid, plastic wrap, or a clean damp towel.
- Let the dough rise at room temperature for about 60–90 minutes, until it doubles in size. When you press the surface gently with a fingertip, the indentation stays instead of bouncing back.
6. Chill For Flavor (Optional, But Worth It)
For deeper flavor and easier shaping:
- After the dough doubles, gently deflate it by pressing down with your hands.
- Cover the bowl again and slide it into the fridge for at least 4 hours or overnight.
- Cold dough shapes more neatly and develops that slight tang you taste in bakery English muffins. If you’re in a hurry, stay at room temperature and move straight to shaping once doubled.
Shaping The Muffins: Turning Dough Into Little Discs Of Happiness
7. Prep Your Work Area
- Line a large baking sheet with parchment paper.
- Sprinkle a generous layer of cornmeal or semolina over the parchment. This stops sticking and gives that classic gritty crust on the outside of the muffins.
8. Divide And Shape
- Lightly dust your work surface with flour and a little cornmeal.
- Turn the dough out of the bowl onto the surface. If it came from the fridge, it feels firm and cool; that’s helpful.
- Pat the dough gently into a thick rectangle about ¾–1 inch high. Don’t press aggressively; you want to keep some of the air inside.
- Use a round cutter about 3 inches wide (a biscuit cutter or even the rim of a glass) to cut circles from the dough. Press straight down; avoid twisting, which seals the edges too tightly.
- Place each round onto the cornmeal-dusted baking sheet.
- Gather any scraps, gently press them together without overworking, pat out again, and cut more rounds until you use all the dough.
- You end up with 10–12 dough rounds, each already starting to look like future English muffins.
Second Rise: The Puffy Stage
9. Let The Rounds Rise
- Sprinkle a little extra cornmeal on top of each dough round.
- Cover the tray loosely with plastic wrap or a clean towel.
- Let the muffins rise at room temperature for 30–45 minutes.
You’re looking for:
- A visible puff
- Rounds that look noticeably lighter and slightly domed
- They will feel airy if you tap them lightly with a fingertip.
Griddle Time: Where The Crust Happens
This is the fun part—things start smelling like a bakery.
10. Preheat Skillet And Oven
- Heat your oven to 350°F (175°C). Place a baking sheet or oven-safe rack inside the oven.
- Set a large, heavy-bottomed skillet or griddle over low-medium heat on the stovetop. Give it several minutes to heat evenly.
- Lightly grease the surface with a thin film of neutral oil or butter, wiping off excess with a paper towel. You want a slick surface, not a deep pool.
11. Cook The Muffins On The Griddle
- Gently lift each dough round from the tray, keeping the shape intact. Excess cornmeal falls away; that’s fine.
- Place a few rounds on the hot skillet, leaving space between them. They expand a bit while cooking.
- Cook the first side for 6–8 minutes. Watch the edges: they start to look dry and slightly set while the bottom turns golden brown.
- Flip the muffins with a spatula and cook the second side for another 6–8 minutes. Aim for an even, deep golden color on both sides.
- The heat stays on the lower side. High heat gives burned outsides and raw centers, and we are not doing that today.
Finishing In The Oven: Ensuring Perfect Centers
12. Bake To Finish
- As each batch finishes on the skillet, transfer the muffins to the warm baking sheet or rack in the oven.
- Once all muffins receive their golden griddle treatment and sit in the oven, bake them together for 8–10 minutes.
This final bake ensures:
- Fully cooked centers
- A tender crumb
- No doughy patches when you split them
- After baking, remove the muffins from the oven and transfer them to a cooling rack. Let them cool for at least 10–15 minutes. Steam escapes, and the texture inside settles into those coveted little air pockets.
How To Split And Serve English Muffins Like A Pro

You worked this hard; you deserve proper nooks and crannies.
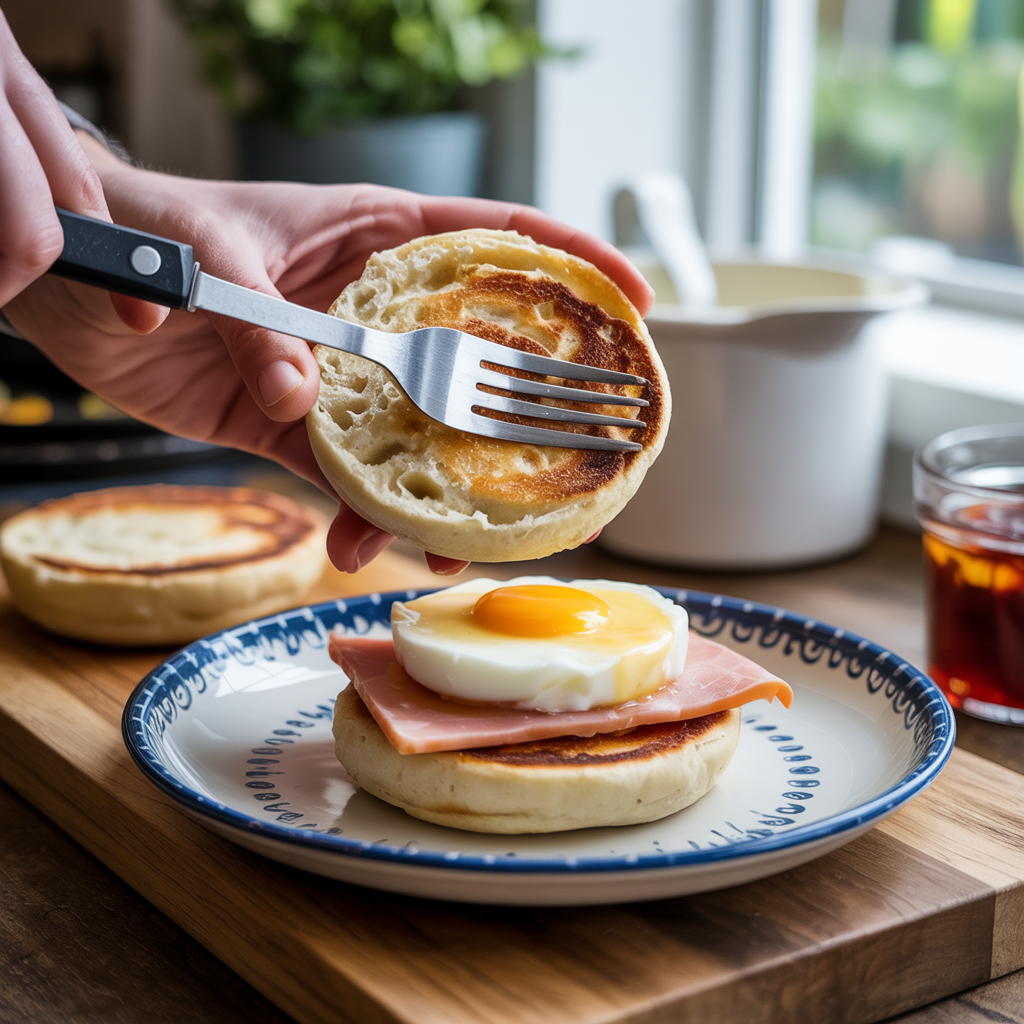
13. Split The Right Way
- Take one muffin and hold it on its side.
- Use a fork and poke it all the way around the side, creating a ring of holes.
- Gently pull the halves apart with your hands.
- This method gives a rugged, craggy surface that toasts beautifully and catches butter, jam, egg yolk, and anything else you throw at it.
14. Toast And Devour
- For simple bliss: toast both halves until the edges crisp and the interior warms up. Spread with butter, jam, honey, or peanut butter.
- For breakfast sandwiches: layer with egg, cheese, and sausage or bacon.
- For eggs Benedict: toast the halves, add ham or smoked salmon, a poached egg, and a smug amount of hollandaise.
There’s something grounding about working through a simple yeast dough, watching it rise, and then hearing that faint sizzle when it hits the skillet. English muffins look humble on the outside, yet the first bite tells a different story: soft interior, gentle chew, and a thousand little pockets waiting for butter and everything else your breakfast heart wants.
Once you’ve done this once, the process starts feeling less like a project and more like a ritual—mix the dough at night, cook in the morning, stack them on a cooling rack like a tiny bakery you own.
Print this, smudge it with flour, and let it live in your kitchen drawer. Every time your toaster begs for something better than store-bought, you’ll know exactly what to make: Making the BEST Homemade English Muffins!!!
Do not miss these Sugar-Free Baking Recipes!